
Mac Switcher Tutorial: Disk Images
When Windows users start using Macs, there are a few things which throw them off. One of them is how to close programs: in Windows, you can quit an application by closing the window, using that “X” button at the top right of the window. And while that will work in a few Mac apps (like System Preferences, for example), it will not work for most programs. Instead, closing the windows just… well, closes the windows. The app stays open. Immediately, this is only apparent by the fact that the app’s menu bar is still visible, but that goes away when the user clicks on something else, like an active window from another app, or the Desktop. It’s also noticeable from the Dock, where a tiny black triangle below an app’s icon indicates that it’s still open, or from the Command-tab program switcher–but since new Windows users don’t know those, either, they don’t see what’s going on. A few times I have been asked by switchers as to why their Macs have slowed down so much, only to find that they are unknowingly running a dozen and a half apps at the same time with only 512MB of RAM.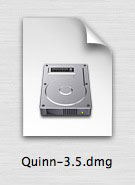
So as you can see, not knowing the differences between platforms can get you into a bit of trouble sometimes. Another very common problem area is with disk images, which as far as I know, are mostly just used on Macs. They are a way of sending compressed data from one place to another. On Windows, people usually use the ZIP format to do this; disk images on the Mac work differently, thus causing the confusion.
In this post, I am using the disk image for a freeware game called “Quinn,” essentially a nice version of the Tetris game.
When a disk image arrives on your computer, it looks like a picture of a hard drive on a piece of paper, as pictured above and to the right. It has the filename extension “.dmg” (for “disk image”). This is the compressed version. If you’ve seen “.bin” and “.cue” files on a PC, this is their equivalent. It is, essentially, the image of a physical storage device. It’s the same as taking a CD or DVD and copying it precisely on your hard drive, for example; that’s why such files are often used to make copies of such disks. But it does not have to be a copy of an actual physical disk; that’s merely one use.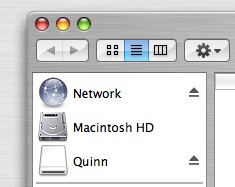
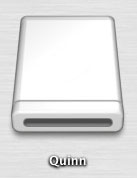 When you open up the disk image file by double-clicking on it, another icon appears on your desktop, which usually appears like the image at left. It does not matter where the original “dmg” file is on your computer, the new disk icon will appear on your desktop. It also will show up in the left-hand sidebar in any open Finder window, along with your other physical disks (see right). At this point, it is acting exactly as if you attached a hard disk or popped in a DVD; it does not act like a file on your computer, but like an attached drive. Note that you can see both the “dmg” file and the virtual disk which came from it at the same time.
What is important to remember is that the virtual disk is not really “on” your computer; it is a temporary representation of that original “dmg” file. You can test this by throwing the original “dmg” file into the Trash while the virtual disk is open, and then trying to empty the trash; you’ll get an error message (below, right) telling you that the file is still in use.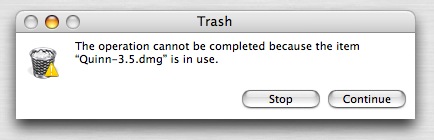
Usually, when you open up a disk image, the contents of the image will open up in a new Finder window, as pictured below (in the case of Quinn). There are a couple of things to note about this window. First of all, there’s no toolbar or left-hand sidebar; the window is optimized to make it appear slicker. Personally, this annoys me, but there’s a simple solution: click the “toolbar button” which is located at the top right of any Mac window (see small image below right); your toolbar and sidebar will reappear (or disappear, if they were already visible).
However, you don’t have to bring the sidebar back; it’s just convenient sometimes, as I’ll explain below. Instead, for now, just look at the window with the disk image contents below:
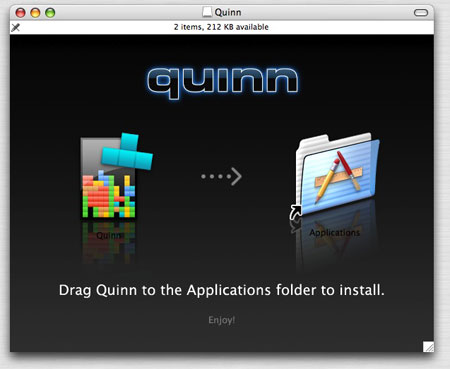
This is an example of a well-designed disk image window. The reason: it’s an application, and they kindly gave you a shortcut (or “alias”) to your Applications folder. Here, it’s dead simple: drop the icon into the shortcut for the Apps folder. A copy of the program is made to your computer. Bam, you’re done. Sometimes they don’t give you the shortcut, and that really annoys me. Why? Because when you open a disk image, the sidebar is missing, and the sidebar is usually where your Application folder can be easily accessed from. Without a sidebar, and without a shortcut to the Applications folder, it becomes harder and less intuitive as to where to put the file in the right place (hint: use the toolbar button to show the sidebar, then drop the icon into the Applications folder visible in the toolbar).
There’s another reason why not including an Application folder shortcut can confuse people: they assume that the virtual image is actually “on” their computer, and so they just run the app from the disk image directly, without copying it onto their computer. This will work, but only in a limited fashion. For example, I’ve seen people drag-and-drop the virtual app from the virtual image onto their Dock. This is fine, so long as the disk image is open. But then they shut down and restart their computer–at which point the virtual disk is discarded. When they then click the Dock icon for the app, the original “dmg” file is re-opened automatically, the virtual image is brought back up, and the program runs again. Sloppy, but it still works. Trouble ensues when the user later trashes the “dmg” file, thus erasing the program–and it surprised when the Dock icon can no longer find the program. Oops.
You might think now that disk images are more trouble than they’re worth, because of this long and complex explanation; however, the process is actually very simple. When you get a disk image, double-click it to open the virtual disk. Then copy the contents to the location on your computer where they are needed (usually the Applications folder, but sometimes elsewhere). Then just eject the virtual disk and erase the “dmg” file (unless you wish to archive it somewhere). That’s all.
 Small detail: there are three ways to eject the virtual disk. One: click the virtual disk icon on the desktop and type “Command-E” (which also will eject any other kind of disk which is selected). Two: go to the sidebar in an open Finder window and click the “eject” icon to the right of the disk’s icon. Or three: drag the virtual disk icon from the Desktop to the Trash–which, as you’ll note, transforms into a metallic “Eject” icon in this instance.
As soon as you’re used to disk images, you’ll find that they can be as convenient and as easy to use as “zip” files, or any other form of compressed data. But they also have another function: using Apple’s “Disk Utility” program (in the “Utilities” folder, which is in the “Applications” folder), you can save a disk image onto a CD or DVD. That is, the CD or DVD will become an exact physical copy of the virtual disk image as stored in the “dmg” file. This is also a way to copy a CD or DVD–you can use “Disk Utility” (or better, an app like the freeware “Burn“) to make a “dmg” copy of a disc, then make new discs by impressing that “dmg” file onto them.