
From Windows to Mac: Three Biggest Tips for Switchers
Having helped several people make the switch from Windows to Macs, I have seen pretty clearly some common problems people have when making the switch. Walt Mossberg wrote a short article on this, and his observations are pretty spot-on, albeit abbreviated and limited. I just figured I’d do my own long-winded version.
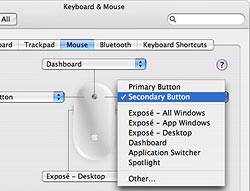
First, and Mossberg touches on this, you should get used to right-clicking. This is less a tip and more an important preparatory step. Your Apple mouse can do a right-click even if there is no apparent second button–just press or rock the mouse on/to the right side. If that still results in a left-click, then go to System Preferences (in the Apple menu at the far left of the menu bar) and select “Keyboard & Mouse”; click the “Mouse” tab at top (illustrated here), and make sure that the right side of the mouse is set to “Secondary Button.” Also, keep in mind that you can buy and use almost any 3rd-party mouse with the Mac. Alternately, a right-click can be simulated by holding down the Control key and clicking the left mouse button. On a trackpad, holding two fingers on the trackpad and then clicking also activates “right-click” (contextual menu).
That out of the way, for anyone who is using their first Mac after years of Windows dependency, here are some tips that’ll make it much easier:
1. Quitting programs: Mossberg puts this somewhere in the middle of his tips, but I find it’s the #1 difficulty Windows users have getting used to. Windows users are used to quitting everything by clicking the red “X” button at the top right of the window. The problem with that system is that it’s not consistent: sometimes by clicking the “X” you’re closing a window, sometimes you’re quitting the program. And in some apps, a double set of buttons appear, the top ones for the program, and the bottom ones for the document being viewed.
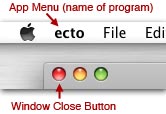 On the Mac, you don’t quit the program by closing the window; clicking the red button on the top left (Window Close Button) will not close the program, only the window the button is on. The program itself is based in the menu bar–which, on the Mac, is always at the top of the screen, and is not part of the window. Switchers will close the window they’re working on by clicking the red button, and think they’ve quit the program–but will not notice that the menu bar for the program is still active (you can tell by looking at the “App Menu,” the boldface menu just to the right of the Apple menu). At this point, the menu bar is all that is “left” of the program. Since Switchers usually click on something else and, in so doing, switch the menu bar’s attention to the new program, they don’t realize that the previous program is still running and taking up valuable memory space. I have often discovered Switchers who think they’ve got no programs running, but in fact they have more than half a dozen still open.
 If this happens with you, then you should learn a few easy things that will help you avoid this problem. First, learn to quit by using the keyboard: Command (Apple key) + Q. It’s an easy left-thumb-and-forefinger move, much easier than reaching for your mouse and aiming it at the little button. It will not only quit the program, but it will close all windows which are active, meaning you don’t have to click the red buttons for multiple windows if you’ve got them open. As an added bonus, some programs, like Apple’s Mail app, will remember the windows you had open, and will re-open them in just the same way as you had before when you open the program the next time.

Next, take a closer look at your Dock, that strip of icons at the bottom of your screen. If you’re using Leopard, you’ll notice that the open program icons have a little, blue-ish indicator light under them (on older versions of the Mac OS, it was a back triangle). This is a quick and easy way to check which programs are still running.
 And finally, master the Command + Tab shortcut, which allows easy switching between programs. Although this is one of the few features that Apple stole from Microsoft, it’s one that few Switchers seem to know about–most Windows users I have encountered don’t know about Alt + Tab on Windows. On the Mac, Command + Tab (you should keep the Command key depressed while repeating the Tab key until you’ve picked out the app to bring forward) will by its nature show you which apps are still open. As an added feature, you can hold down the Command key, hit Tab until you get to the app you want to quit, and then type “Q” with the Command key still depressed (easy, as the Tab and Q keys are adjacent); this will allow you to quit programs without even making them active.
Get used to those three points and you’ll not only fix your problem, but you’ll be navigating and quitting much faster and more efficiently than you ever did in Windows.
2. Switching Between Windows: Another problem I have seen Switchers deal with is getting from one window to another. I’ll watch a Switcher do this by moving the active window over to one side, then clicking on the window below it. While this works, it’s messy and is generally not an efficient way of doing things.
As I described before, using the Command + Tab shortcut can be a quicker and easier way to switch between apps. Another way is to use the Dock–just click on the icon of the program you want to switch to. If the program has several windows open, and you want to switch to a specific window within the program, just right-click on the Dock icon, and you’ll see a menu appear above it with a list of all open windows in the app, as well as other options.
But the best way to switch between windows–especially from within a single program–is to use Exposé. Not found on Windows, Exposé is a very cool tool that makes life easier. By using a few easy keystrokes, you can spread out all your windows and choose the one you want, keeping everything neatly in place.
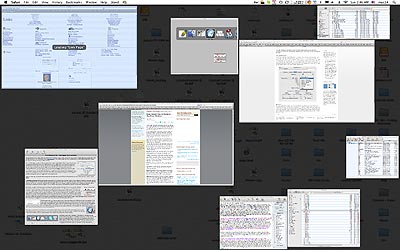
Out of the box, the shortcuts are: F9: spreads out all non-hidden windows for all open programs (pictured at right); F10: spreads out all open windows in the current app you’re using; and F11: clears all open windows to the sides so you can temporarily see the Desktop, until you hit F11 again to bring the windows back.
With F9 and F10, the windows spread out so that all are visible in reduced form (with the background darkened out to make the windows more visible); as you pass your mouse over each one, the window’s title appears; when you click a window, they all fall back into place, with the window you selected on top and ready to use.
The F11 (Show Desktop) feature is the best: it allows you to sweep aside the open windows, grab an icon from the Desktop, sweep the windows back in, and drop the icon into the desired window.
There’s more you can do with this feature, but mastering those basics will save you a ton of time and trouble.
3. Customizability: The Mac is highly customizable. This includes more than just wallpaper. While themes (or “skins”) are available only with special software, most everything else is changeable.
You can add or subtract icons to and from the Dock, including programs, folders, and documents (apps go to the left, folders and files to the right), and “stacks” of icons which spread out in an arc can also be added. Folders added to the dock can be right-clicked to expose a hierarchical menu of its contents.
OS X windows can also be customized. Aside from the view (which includes an iTunes-like Cover Flow), you can activate or deactivate the toolbar and left sidebar by clicking on the white button at the top right of the window. You can control exactly what shows in the sidebar at left; either open “Preferences” under the “Finder” menu and click on “Sidebar” (to turn on or off basic sidebar items), or simply drag-and-drop folders, files, or programs into the sidebar under “Places.” If you click on a folder in the sidebar, that folder will open into the existing window. Clicking on a document will open the associated app, while clicking on an app in the sidebar will simply open the app (kind of like a Quick Launch or substitute Dock).

Furthermore, the window toolbar (pictured directly above) can be customized (right-click on the toolbar) to add or delete buttons and features; even outside of this mode, one can always drag files, folders, or apps into the toolbar for another quick-launch style of shortcut. Once added, these shortcuts will appear in every Finder window.
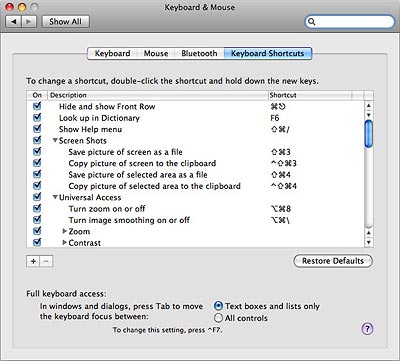
However, a key point of customization is with keyboard shortcuts. Many people don’t use these, and might not even feel comfortable with them–but I strongly urge such people to try to get used to them. It is the same kind of difference in efficiency as you would see between hunt-and-peck and touch-typing; knowing your keyboard shortcuts can make you fly through stuff that you used to take a long time with. But what’s nice about the Mac is that you can customize just about any keyboard shortcut–and not just with the OS, but with any program. Go to the Apple Menu, System Preferences, and Keyboard & Mouse. Then click on the “Keyboard Shortcuts” tab at top left. This will not only tell you what the existing shortcuts are, but it will allow you to change them–any of them.
The immediate list will show you all of them main Finder shortcuts, which you can change by clicking on the shortcut and then typing your own (conflicts will raise flags). But in addition to these, you can set your own by clicking on the little “+” button at the lower left. In the dialog box it brings up, select the application you want to change (or else let it default to all applications), then type the menu command and the shortcut. The next time you open the app, the shortcut will be active (and will show up in the menu listing for the command).
There is a lot more which can be customized–just look around the system preferences and the preferences for any app or for the Finder–but what I have just described should give you an idea of how much you can change how the OS responds to you.
A few key shortcuts: Command + Delete (the delete key next to the “+” key) will put selected items into the trash; Command + Shift + Delete will empty the trash. Command + “?” will open Help; Command + “,” will open Preferences; Command + “.” will often stop a process in action. Command + Shift + S is usually “Save As…”. Command + E will eject a selected disk.
Extra Stuff: I just wanted to add a few things you should know about:
Dropping icons: while Windows is limited as to where you can do this, in Mac OS X you can drop just about any icon anywhere to open or add it to what you are doing. Drop a document onto an icon on the Desktop, the Dock, the Sidebar or toolbar, and it open the file in the app to which the icon belongs.
Easy Uninstall: Want to “uninstall” an application? Except for special circumstances, it’s easy: just drag the icon into the trash. This will leave behind related preference files in Library folders, but they are usually small in size and not a trouble to leave behind. Uninstalling will not risk screwing up your system like it does in Windows.
Spring-loaded folders: Drag an icon over a folder (anywhere, including in the Sidebar) and hold it there for a moment; the folder will open for you. This can be done for as many folder levels as you like. After you drop the icon, the various folders will snap shut, except for the one you dropped the icon into.
Quick Look (Leopard only): select any icon, then hit the space bar; if it’s a supported file type, then a preview will open up. If the content is more than just one page, you’ll be able to scroll through the whole thing. Music and movies will play.
PDF: Mac OS X has always been PDF-friendly. You don’t need Adobe Acrobat, Apple’s “Preview” app will open them OK. And any app can create PDF’s in OS X: just go to Print in the File menu, click the “PDF” button, then select “Save as PDF…” and you’ll have a PDF of whatever file you’d otherwise be printing. Excellent for sharing docs between computers.
There’s lots more, but that should be enough for one sitting.
Or you could just keep using your Windows machine, which works perfectly well for pretty much anything you want anyway. 😛
Exactly. Keep your old copy of Win XP and run it in bootcamp or virtual with Parallels. So you can run those Sharepoint and Direct X locked in sites that require the use of the insecure IE 7.
If it does get hosed completely by your hundreds and thousands of viruses, no worries whatsoever. You can easily rebuilt the entire Win XP environment with just a couple of clicks with Time Machine. How easy is that?
Really nice writeup dude. I sure will recommed this article to my switcher friends. And Walt boy’s little writeup was really pathetic. To have that junk come out of such an intelligent guy is really sad. Anyway, hope to see some more from you.
Good article, and nice screenshots.
Well done. Great pics with labels!
@ Paul
“… just keep using your Windows machine, which works perfectly well…”
which just proves the old addage, ‘You can lead a horse to water, but you can’t make it drink’
Paul, we are content for you to stay in your slum – if that’s what you want 😉
Hey people, let’s not get too heavy with the OS flame wars. I probably did too much of that in the blog post myself–sometimes I’m not even aware of it. I didn’t intend this to be an anti-Windows screed, I just wanted to give a few helpful pointers. I guess I should tone it down myself a bit more in posts like this….
you forgot to mention,
the mac os never crashes or gets malicious code, the mac never has hardware problems
and is cheaper than a pc to own, it’s also so easy to use you never have to read the manual ’cause it magically reads your mind whenever you want to do anything like compile a cd to burn and setting up an isp or e-mail account works the same way it just automatically finds the info for you as well as your domain etc.
I forgot to mention, you don’t need to create or remember passwords either. macs don’t need security.
M.: Irony?