Gimme a Job
I have always taken job hunting seriously. I feel that it’s something you have to take on whole-heartedly, not half-assed. Me, I hunt down all job resources I can find, weed and sort, schedule interviews (schedule a few throwaways first so you can get some practice in), research the job and the company as well as you can, dress up and arrive a few minutes early (not too early), so forth and so on. In the end, if you’ve done it right, then you will have a few good job offers at least, and can take your pick.
But nowadays I am on the other end of the process. Like I was ten years ago, I now find myself making, not reading, the classifieds listings and sorting through resumes. Between then and now were the blissful years of only working, but recently I was called back in for a spell to manage again for a while. And it is depressing to see what comes forth when you list a job.
I mean, seriously. Far more than half the applicants do not have the basic, bottom-of-the-barrel, “must-have” qualifications for the job. Okay, maybe they think that they’ll get lucky, maybe they hope that the employer is aiming too high. But some of these people clearly just shoot out resumes to everyone in sight–the scattershot approach. Clumsy. Messy. Maybe even desperate. But hey, at the very least, take the trouble to send a separate email to every employer instead of lumping them all together in the Cc list for all to see.
You wouldn’t believe how sloppily some people put together these things. This time around, we needed several different positions filled, and included several in the same ad. Very few specified which position they were applying for, even though the positions were widely variant; I wound up having to read the resumes closely and guessing which position the person is applying for. Sometimes I have to read really close, because the information is often muddled. Education histories don’t specify what major the person’s degree was in. Employment histories leave out vital details. Heck, one person didn’t even bother to add which city he lived in.
Reading these things, it really makes me want to write down a primer on how to write a good resume. So here goes. Note that this is for an average job calling for moderate experience and qualifications–if it’s a minimum-wage job, just send a one-pager; if it’s for Rocket Science, then maybe send a tome. But most times, it’s in between. Points to consider:
- Format Counts: as superficial as it may seem, careful attention to formatting makes a difference. Don’t use templates–anyone who reads resumes for a living has seen them all and can spot the people who use the standard forms. Use a good font–Optima for sans serif, Garamond for serif. I can’t explain why, but many outstanding applicants I have interviewed had Garamond resumes. Use character spacing, small caps, regular tab settings, the works. Try to make it look neat, organized, and elegant. How your resume looks tells the employer how important this is to you.
- (If by email) Save your resume as a PDF: send both MS Word and PDF formats if you must, but PDF preserves formatting perfectly, and is a universal format.
- Use a cover letter: a cover letter is like a thesis statement–it explains very quickly to the employer why they should hire you. Explain what position you are applying for, and list the basics as to why you’re qualified. The cover letter should be three medium-length paragraphs–not too brief, not too long. If you’re sending your resume by email, then give a truncated cover letter in the email, and a full one in the cover page of your resume.
- Avoid the clichés: don’t say that you’re a “team player,” or that you “want to make a positive contribution to the company.” (Yes, I actually get those.) Be a bit more original than that. Sculpt your patter to fit the position. Don’t go too far or else you’ll make your interviewer gag. Reign it in.
- Cover the basics: Put your name, full address, telephone number(s), email address, and all vital information on the resume. Sounds basic, but you’d be surprised at how many people mess up this stuff.
- Customize: don’t use the same resume for every application. Research each job you apply for. Find out something about the company and the job you are applying for, and rewrite that specific resume to match it. Several times I have gotten resumes that were obviously intended for a different job, and it makes the applicant seem like they don’t give a damn. Generalized resumes usually give a weaker impression.
- Make it easy for the employer to be impressed: I can’t tell you how many times I have had to scour resumes for any indication that the person has the qualifications for the job. It should all be apparent, right up front. Education first–be brief but informative. Degree, major, university, years, honors. Then employment history–but here’s where you have to be careful. Don’t just go listing every job you’ve ever had. Do you think I care if you were a waiter at a pizza joint if you are applying for a job as a graphic designer? Okay, if you leave all of that out then there will be big holes and the employer will wonder why. So categorize: list the positions relevant to the job you are applying for first, then list other positions later, under a different heading. But don’t make the employer sift through every part-time and temp job you’ve had in order to find the few jobs that show you have the experience they want.
- Be specific where it counts: When you list qualifications specifically relevant to the position, then you go into detail. Make sure they’re aware that you know how to do the job in question. If you are applying for a job managing a bookstore, then mention the specific duties you had when you worked for Barnes & Noble, but leave out the details of how you were the personal fitness trainer to that country & western singer, no matter how cool that was.
- Be thorough but brief: Don’t take 30 pages to list the stunning array of publications you’ve authored and seminars you’ve given. Keep it to 2 pages, maybe 3. One page is too short, often not giving me enough reason to be impressed; more than three is showing off. If you’ve got so much, list only the most impressive stuff, and then add a note that there’s more where that came from “upon request.” If they’re interested, they’ll request. If you absolutely must, then send a brief resume and an “extended” resume–don’t force them to read a novel.
- Add references: most jobs will want them, and they will check them. List them in your resume. If you have letters of reference, okay–but make sure to give email addresses and telephone numbers for them to check, and alert your reference people that they may be contacted.
- Have everything ready, on request: anticipate what the employer might ask for. Have copies of every degree, every college transcript, every letter of reference, every supporting document you can think of, ready to fax/email/carry in upon request. They will ask for it; “I’ll have to look into getting that for you” is less impressive than “here, if you want the originals let me know and I’ll get them for you as soon as I can.”
- Spell check: nothing says “don’t hire me” more than spelling errors on your resume. Don’t just check for the squiggly red lines, actually read the thing, several times, and look for any errors, in spelling, wording, style, etc.
That’s everything that comes to mind right now. Follow these rules and your resume should be in the top 5 percent at least. As depressing as these resumes sometimes get, I always have the assurance that if I ever need to look for a job, I will most definitely stand out amongst the applicants.

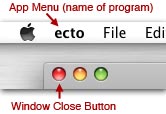 On the Mac, you don’t quit the program by closing the window; clicking the red button on the top left (Window Close Button) will not close the program, only the window the button is on. The program itself is based in the menu bar–which, on the Mac, is always at the top of the screen, and is not part of the window. Switchers will close the window they’re working on by clicking the red button, and think they’ve quit the program–but will not notice that the menu bar for the program is still active (you can tell by looking at the “App Menu,” the boldface menu just to the right of the Apple menu). At this point, the menu bar is all that is “left” of the program. Since Switchers usually click on something else and, in so doing, switch the menu bar’s attention to the new program, they don’t realize that the previous program is still running and taking up valuable memory space. I have often discovered Switchers who think they’ve got no programs running, but in fact they have more than half a dozen still open.
 If this happens with you, then you should learn a few easy things that will help you avoid this problem. First, learn to quit by using the keyboard: Command (Apple key) + Q. It’s an easy left-thumb-and-forefinger move, much easier than reaching for your mouse and aiming it at the little button. It will not only quit the program, but it will close all windows which are active, meaning you don’t have to click the red buttons for multiple windows if you’ve got them open. As an added bonus, some programs, like Apple’s Mail app, will remember the windows you had open, and will re-open them in just the same way as you had before when you open the program the next time.
 And finally, master the Command + Tab shortcut, which allows easy switching between programs. Although this is one of the few features that Apple stole from Microsoft, it’s one that few Switchers seem to know about–most Windows users I have encountered don’t know about Alt + Tab on Windows. On the Mac, Command + Tab (you should keep the Command key depressed while repeating the Tab key until you’ve picked out the app to bring forward) will by its nature show you which apps are still open. As an added feature, you can hold down the Command key, hit Tab until you get to the app you want to quit, and then type “Q” with the Command key still depressed (easy, as the Tab and Q keys are adjacent); this will allow you to quit programs without even making them active.