
New Cell Phone
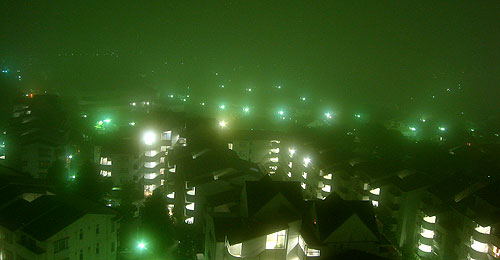
 Japan is rather cell-phone crazy. My folks have a couple of cell phones, but compared to the feature-rich array of phones in Japan, theirs look positively boring. Walk down a city street in Japan, and it seems like there will always be a person or two in sight talking on their phone. Even more so, watch people on trains: many will have their cell phones open (see photo at right), reading or writing email, looking at photos. When Hiromi and I went to Otaki Falls, a couple came down into the waterfall pocket valley and immediately took photos of everything with their cell phones.
When I most recently came to Japan to work and live in 1998, I held back getting one, figuring that it would only make me more accessible to staff at my school to call me in to do more work, and wouldn’t be very useful for me. But after a year and a bit, I caved in and bought a simple model, and the base calling plan (2000 yen / $16 a month, 10 yen / 8 cents per minute for calls). That worked fine for me, but after four years, my phone–basic when I bought it–was looking more and more like a fossil. Also, having started this blog, I began to get interested in the idea of moblogging. At first, I waited for Bluetooth-enabled models to come out–there are some great Sony-Ericsson phones, like the P-800, which can work great with Macs. However, after waiting more than 6 months, I realized that Bluetooth  phones are just not happening in Japan anytime soon. In fact, the number of Bluetooth-enabled cell phones in Japan fell from two models to zero while I watched.
So I figured that it was time to break down and buy. I tried doing the best research I could with the limited consumer-oriented review material available in Japan, and settled on a phone using the same carrier / plan I was already using; they have a phone, just recently released, which fit my bill. It’s the DDI-Pocket H” H-SA30001V (Japanese language site).
 Staying with the same plan helped me avoid the hassle of canceling and re-signing up for phone service; with the new phone, I have the same number and the same calling plan prices I signed up for four years ago. It also made it easy for the people at the store to transfer the phone book data from my old phone into my new one–a pleasant surprise, as I had no idea that was possible, and they didn’t tell me that they did it–I found out by going home and finding all my numbers there.
But be careful when deciding what to do when you switch–there are two options if you stay with the same carrier. One option, in which you keep the same phone number and calling plan, costs 2000 yen more. The option which seems costs less keeps you with the same carrier, but allows you to change the phone number and calling plan. However, the cheaper plan has hidden costs: a 2000 yen fee for cancellation, a 2000 yen fee for re-signing, along with a few other fees as well, making the deal more expensive than the first option.
 Features of the SA3001V that attracted me included the CCD camera, the postage-stamp sized external LCD screen, the phone-to-PC data transfer ability, and, something I had not expected, the ability to switch all menus to English! (See left.) The phone also has the usual extras, such as calculator, schedule book, alarm clock and so forth. Another nice feature they have is the ability to match ring tones and photos with phone numbers; if, for example, my friend Andrew were to call from his cell phone, I would hear a specific ring tone and see his photo flashed on the mini-LCD screen before answering the call.
I did find out some facts about the camera which showed up the advertising to be a bit misleading. One, for example, was the claim that the CCD camera has 110,000 pixels, suggesting the ability to take photos with dimensions like 300 x 370 pixels. It turns out that this phone camera actually takes photos the same size as all the others–144 x 120 pixels–so I guess the “110,000” number has to do with the digital zoom feature, and has nothing to do with the actual photo size.
 Also, there are quite a few freeware programs allowing you to engage in data transfers, but they are all (of course) in Japanese. The one I tried to install on my English-language Windows machine crashed on install. The Mac version did install, but only works under OS 9.2 (not in Classic mode). After spending a few hours banging my head against the wall, I finally got it to work, and was able to use the “H Tonya” to edit my phone book. Frankly, this is a big thing for me, because I absolutely hate having to key in my entire phone book using those danged tiny buttons, especially when I have to first switch to English for every entry, and then cycle through up to eight characters to get the single one I want.
 Another nice feature is the addition of a slim, English-language summarized version of the instruction manual. With only 40 pages of notes, it pales to the 577 pages in Japanese, but it is far more than I had hoped for. It looks like Sanyo, the phone maker, is realizing that there are non-Japanese speakers living in Japan and some concessions would be helpful for them.
So I haven’t used or even found out about all the features yet, but so far, it’s worth the investment. I hope it hold up over time.
Now to figure out moblogging, once I can find the time….


 Um… well, maybe the rainy season
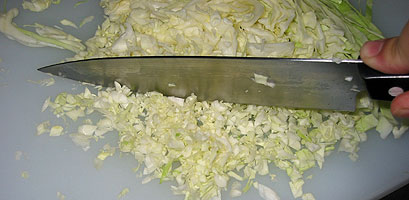 First, slice some cabbage, perhaps three or so quarter-inch thick slices from the middle of the head. Discard any bulky pieces too close to the stem, then start chopping, until you’ve reduced it to tiny pieces. The amount you’ve chopped should amount to about a cup, slightly packed. When finished, throw them into the mixing bowl.
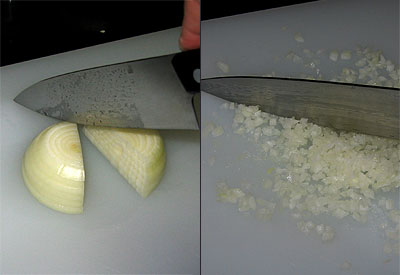 Next, take half an onion (just a regular white onion), and chop it into similarly small pieces. Then throw those into the bowl, too.
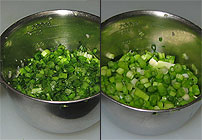
 Take whatever amount of garlic, if any, that you prefer–I took three lobes, or whatever you call them–and grate/crush them. Add this to the mixing bowl as well.
 After the chicken is added, top it off with the seasonings you prefer. Salt and pepper are safe bets. I use pimenton (smoked Spanish pepper spice) because, well, I use it on everything. So on it goes.

 OK, here are the shells to use. They come in different sizes and thicknesses. I always go for the large ones, partially because I like big gyoza, but also because the smaller ones create a lot more work–you have to make more, and as you’ll see, the shell crimping can be time-consuming. I have no preference between the thick and thin types. Here I am using the thin ones. You can usually find them in your (Japanese) supermarket near the ground meats; if not, ask. The ones I use come in packages of 20.
 Have the gyoza filling mix in the mixing bowl handy, as well as an empty plate to put the finished gyoza. Get a small dish or saucer, and put a small amount of flour (a teaspoon, perhaps, no more) onto it, then add a little water; mix some flour into the water until it becomes milky, but not very thick. Open the gyoza shell package, and take out some of the round shells; we’re gonna wrap some potstickers!
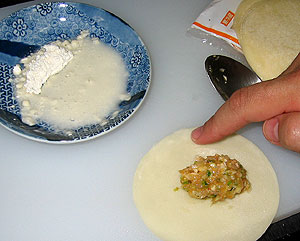 Next, dip the tip of your finger into the flour-water, and apply this to the border of half the gyoza shell (the same side the filling is on), so as to mark out a semi-circle. Only spread enough with your finger to cover the surface of the edge and make it sticky; it should not run wet. This acts like a glue, and is to get the shell to stay closed. In the photo above, I have set the shell on the cutting board only because I needed a hand free to snap the photo; usually, I wet the edges while holding the shell in my other hand.
 You’re going to have to close the shell, but not just in a smooth, straightforward manner. You will have to crimp one side of the border, making creases along the way. Different people have different techniques for this. My way is to bring the two halves of the shell together and close them just at the center point, leaving the sides temporarily open. Then, working from the top/center, I take some slack from the far side of the shell (as you see in the above illustration, I start on the right side), creating the crease–then pressing down hard to seal them together. I do this twice on the right, and twice on the left, for four creases; you do what suits you.

 Now, prepare the frying pan by pouring a small amount of oil (olive oil would be great here) into the pan, then spread it around with a square of paper towel; there should be enough to slightly ‘wet’ all the gyoza as you place them down. Do not pour so much that the whole pan bottom is covered; to the contrary, keep it very light, so that all the oil can be absorbed easily into the gyoza.
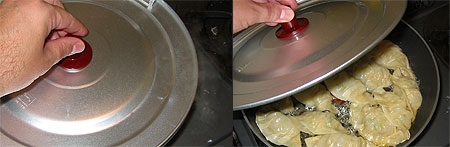
 When the gyoza are done, take the pan to your kitchen sink. Drain any excess water (there shouldn’t be any if you did it right), then uncover the pan, and put a dinner plate, upside-down, over the gyoza. Holding the plate with one hand, turn the pan over with the other, then remove the pan from atop; the gyoza should now be nicely placed on the plate.


 Every five years, you have to renew your Alien Registration Card (aka Gaijin Card, or Gaikokujin Torokusho); I just got mine renewed today. (Image at left–sorry for all the distortion, too much personal info there.) For those of you not in the know, all non-Japanese are required to carry these gaijin cards at all times; if a policeman stops you and you don’t have it on you, then by rights he can take you in to the police station, where you must write a “gomen nasai” letter. You also have to get someone to bring in your gaijin card before you can go. If there is no one to bring your card in for you, you must give the police the keys to your place, and they will get it for you–unless they are kind enough to escort you home while you get your card out for them (happened to me once). Foreigners don’t get stopped just for being foreigners as much as we used to, but it still happens from time to time.
 After getting my new gaijin card, I left the shiyakusho (city hall) and saw a group of people dressed just like the illustration at right. These are the Japan Tobacco “Smokin’ Clean” clean-up team. Japan is getting better and better about smoking, but is still a relative smoker’s paradise. Many restaurants have no-smoking sections, but the smoking sections prevail, and are in nicer areas. Most workplaces, banks, rest areas and other public places are still smoking havens; the major exception is train platforms, which recently became entirely smoke-free.
 The whole “Smokin’ Clean” campaign (when you hear it on television, it sounds like “Smo-kin’, CREEEN!”), aside from being a rather glaring oxymoron, is supposed to address the bad manners smokers are often famed for here, particularly littering. Japanese streets, of course, are far less tidy than is commonly believed overseas, and the major component of that street trash is from cigarettes. I long ago formed, tested and proved (well, to myself anyway) the theory that you could go to any place on any street in Japan at random, stop, and when you look around, see at least half a dozen cigarette butts laying there, often many more.
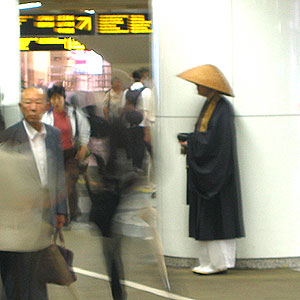 This fellow is often seen standing by a pillar on the very busy basement-level area outside the West Exit of Shinjuku Station. A monk in traditional garb, holding a begging (alms) bowl, with the trademark monk’s hat (“Takuhatsu gasa”). Whenever someone drops some money into his bowl, he rings a bell.
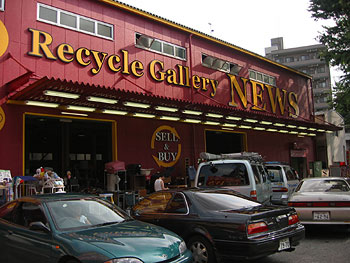 I don’t use the secondhand shops today nearly as much as I used to, but they can be a real boon to those of us starting out in Japan, or here for the relative short term. It’s sometimes hard to find any shops like that worth visiting, though.
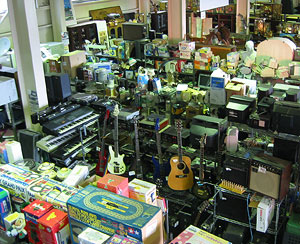 The entire chain seems to have shops all around Tokyo, in places like Itabashi, Sasazuka, Okubo, Suginami and a few other locales. You can visit their