 At school this semester, we organized a Computer Making Club; the school gives any club a semester (4-month) budget of ¥50,000, enough to buy all the components for a decent-mid-range computer. Before we did this, I had always wanted to do this kind of thing, but never got around to it. In part, I figured there would be technical hurdles that would involve a great deal of study, and so put it off until I had time to dive into it. As it turns out, it was not all that difficult to put together– the process is pretty simple, though getting to understand the minutiae about parts is much more involved. I should say that if you know nothing about computers, and especially if you have a phobia about them, you’ll probably have to overcome a bit of a steep learning curve. It helps to know something about computer hardware in general beforehand.
Not that I’m suddenly an expert or anything, but fresh from having successfully slapped together my first PC, I’m beginning to get hooked. I thought I might describe the process here–though admittedly, one of the reasons is so I can look back in a few years and laugh at how naive and uninformed I was. But we did build a PC without much hassle or intensive study, and it did work, so why not describe it here.
First off, you won’t need to solder anything; it will involve buying perhaps 10 or so different parts that you more or less plug together. They include:
The CPU (the “brain” of the computer)
The Motherboard (the computer’s foundation which everything else connects to)
RAM (the more you have, the more apps you can run)
A Case
A Hard Disk Drive (SSDs are also available, but still expensive)
An Optical Drive (unless you go Blu-ray, these are commonly cheap)
A Video Card (optional)
A Keyboard and Mouse (cheap)
A Monitor (you might want to go used on this unless you can spare it)
Once you have the parts, the process is fairly straightforward: install the CPU (with cooler) and RAM on the motherboard, and install the motherboard into the case. Then put the hard disk and optical drives into the appropriate bays. Add the video card if you have one. Connect all the power and data leads, tie the cables off so they don’t get in the way. Close the case, attach your peripherals (mouse, keyboard, monitor), and start up. If everything works, then restart with the OS disk in the optical drive, and install the OS. That’s pretty much it in a nutshell.
Sounds easy, right? Well, in principle, it can be, but maybe we were lucky: nothing went wrong. If the computer doesn’t work, however, then I imagine it’s time to start studying. And though nothing went wrong, we did hit bumps in the road where we spent an hour or two trying to figure our way through a few things–mostly for the classic shortcoming in the world of computers, namely insufficient documentation. However, we did have the advantage of having people with knowledge and experience enough to figure some stuff out and make the right decisions, though none of us were anywhere near expert at this.
While you likely won’t have to learn the intricacies of the BIOS, and you won’t need to solder or really make anything, there is one thing you should do: familiarize yourself with the parts. Know what they do, and understand the different varieties and categories involved.

The first thing you’ll want to do is decide which
CPU you want to use. You could start with the motherboard, and who knows, maybe that’s the smarter choice, but frankly I see the CPU as being a better starting place. It is important to realize that the two must fit: different CPUs have different configurations, and can only fit into certain sockets on motherboards. You cannot just plug any CPU into any motherboard.
There are about half a dozen different common socket configurations, based on how many pins/contacts are on the bottom of the CPU, and how they’re laid out. Intel and AMD are the two big makers, and there are 3 or 4 configurations for each; Intel has the LGA775, LGA1156, and the LGA1366, for instance. The LGA775, as an example, is an older type which supports most currently available Intel CPUs including the later Pentiums and Celerons, and the Core 2 CPU line.
Both Intel and AMD make lots of different CPU models. In this post, I’ll just focus on Intel’s, as they tend to be more popular (and adding AMD’s line to the mix would complicate things). Let me give a quick list of major Intel CPUs, ranked very roughly in terms of speed and age:
Celeron
Pentium 4
Celeron D
Pentium D
Core 2 Duo
Core 2 Extreme
Core 2 Quad
Core i3
Core i5
Core i7
Xeon
If that’s not bad enough, each one can have dozens of different sub-models. The i5, for example, has the 400, 500, 600, and 700 series, with at least half a dozen different CPUs in all. The Core 2 line includes well over a hundred different CPU models released over the past five years.
Each chip has different features, and it can be difficult to figure out which is faster than which–primarily because speed is determined by a variety of features, including the number of processing cores, the amount of cache (on-chip memory storage), the processor speed (in GHz), and the processor architecture in general. You might think that a 6-core AMD Phenom II at 3.2 GHz would outperform a 4-core Intel i5 at 2.66 GHz, but not really. The page I just linked to allows you to see comparative benchmarks, and so get a better idea of what outperforms what.
Fortunately, your choice is simplified by a few factors. First, the Celerons and Pentiums are outdated; fine if you want to buy cheap, used parts and don’t care much about performance, but otherwise forget it. On the other end, chips like the i7 and the Xeon can be costly; unless you’re building a speed demon and price is not an issue, you’ll likely stay away from those as well. For someone with a budget, the Core 2 Duo, Core 2 Quad, i3, or i5 are probably your best bets. After that, look for what’s available in the your price range, and you’ll find you have a much shorter list to choose from. While some chips are much faster than others, CPUs in a similar range will have only minor differences in speed–so you probably shouldn’t fret too much over which is faster unless you’re trying to squeeze every last drop of speed from your system.
If you want to make a computer for less than ¥50,000, for example, the Core 2 Duo might suit best; for less than ¥70,000, the Core i5 would be nice. (I am figuring prices based on mostly new parts and including a video card.) If you want to make a super-cheap computer, then you’re in Celeron and Pentium range, and it starts making more sense to look at used parts.
 Next, the motherboard.
If you go for the Core 2 Duo, like we did (budget concerns), you will need a motherboard with an LGA775 socket. They generally begin at just under ¥5000, and go way up from there. The model we got–a Foxconn G41MX-K–has an OK set of features. It uses the G41 chipset (a chipset is, as it sounds, a set of chips used as a group on a motherboard to control its main functions), not great but respectable; it has a standard PCI slot set (PCI slots allow you to plug in extensions like video cards to improve performance; a PCI Express x16 is something you’ll want to have); and it uses DDR2 RAM (a type of memory; a newer type, DDR3, is newer and better, but not compatible).
Though your CPU will determine the socket type, you should also decide early on which motherboard form factor you want. The main types are based on ATX, the favorite for DIY computer building. The variants include (from largest to smallest) Extended ATX, standard ATX, and MicroATX. Also available is MiniITX, a low-power motherboard form. If you want to have a smaller CPU box, then MicroATX may suit you best. That and the standard ATX seem to be the most prevalent.
The motherboard also has most of the computer’s cable ports built in to its side (in the image above, see the left side near the top); ours had the standard legacy PS2 and Serial ports (for old mice & keyboards), 4 USB-2 ports, a network port, 8-channel sound, and 2 video out ports (one classic analog VGA and one newer digital DVI). More ports can be added in other ways–for example, most cases come with built-in USB ports in the front, which attach directly to the motherboard via interior cables.
We didn’t need HDMI because that would be available on the video card. FireWire is nice, but is being phased out due to USB’s dominance. USB-3 is dandy, but only needed if you have super-fast equipment.
Again, pricing narrows down your options–if you are on a budget, then the dizzying array of choices is made a bit more simple. Our choices were shaved down to maybe a dozen or so as we wanted to stay within ¥5,500.
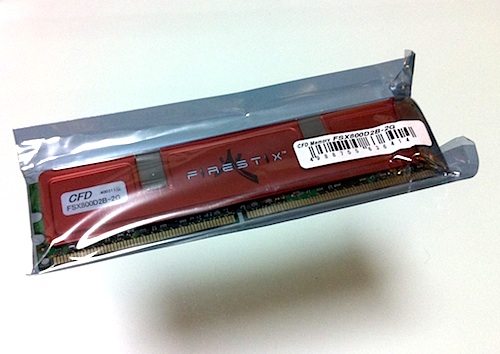 After that, you get RAM. 2GB is generally enough for most purposes today, but I prefer maxing out as the budget allows. We went for 4GB of RAM, which will help the machine be viable for a year or two longer. An important point is how many slots there are for RAM on the motherboard; ours had 2 slots (some have 4 or more), and so we had to get 2 RAM chips at 2GB each. Fortunately, the pricing was not any more per GB that way, though 4GB chips start getting pricey. We got two 2GB chips for about ¥8000.
These three elements–CPU, Motherboard, and RAM–make up the heart of the computer, and were the most expensive parts (roughly half of our ¥46,000 hardware budget).
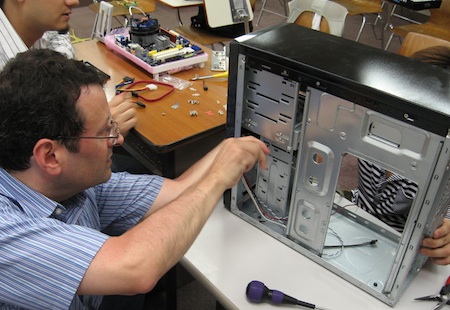
Before working with them, you should have prepared a non-conductive workplace. We used a cheap plastic dish rack lined with bubble wrap, though you might want to prepare something a tad fancier. Be careful handling surfaces and contacts; it’s best to have an antistatic wrist strap to avoid static shocks which could damage the components.
Installing the CPU on the motherboard is relatively easy: open the clamp on the socket, remove the protective shield, drop the CPU into the socket, then clamp down again. Simple.
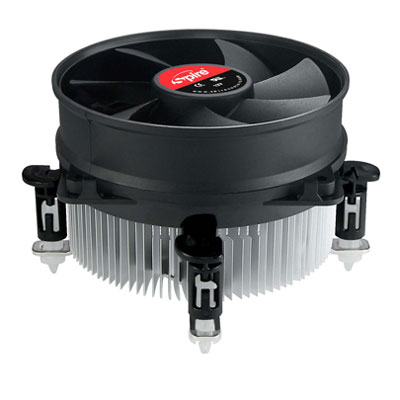 However, most CPUs require cooling units, big ‘ol heat radiators with fans. We bought our CPU used (a Core 2 Duo E7400) for ¥8000, thinking we were saving money–before finding out that new CPUs came with cooling fans, and ours didn’t, so we had to spend another ¥2000 and didn’t save any money.
Installing the CPU cooler was a real bear. First, you must not forget to apply conductive grease to the base of the cooler after making sure the contact surfaces are clean. Without the grease (or “thermal compound”) your CPU will overheat and die. It usually comes supplied with the CPU cooler. Probably a good idea to not let it come into contact with your skin.
There were 4 legs or struts that involved pushing down and twisting so they locked. There’s probably a trick to doing that, but we sure couldn’t figure it out. The first two were easy; the third took a while, and the last one almost killed us. Once the cooler is in place, you have to plug in its power connector; these things are diagrammed out on the motherboard instructions for you.
RAM, on the hand, is a cinch. Make sure it is oriented the right way, then just push down into the slot until it locks. Presto.
There’s the heart of your computer, right there.
In a following post, I’ll talk about choosing a case and power supply, and installing the motherboard into it, then adding the HDD and Optical drive. Fortunately, these are somewhat easier to learn about.


 There are several reasons. One is that most XP users continue to use machines that simply cannot support Windows 7. XP users who could upgrade may be staying away because of the bad reputation Vista imparted, making XP users wary. Then there’s the comfort factor, with XP working quite nicely enough, many wouldn’t want to change–the “if it ain’t broke, don’t fix it” contingent.